Tampilkan postingan dengan label repair. Tampilkan semua postingan
A Singer 401a and Greasy Terminal Prongs
Hi everyone, I know, long time no talk. I recently got to meet Elizabeth from My Sewing Machine Obsession and that was pretty cool. She mentioned that I hadn't written in a while. Over a year!
I've been busy with work and fixing sewing machines on the side, even making housecalls in Manhattan. If you need repair work done on your machine, are in NYC and/or can bring your machine to me in lower Manhattan, drop a line.
Anyways, a customer brought this Singer 401a to me. She came my way from Peter Lappin's sewing blog. The customer had just purchased the machine from a "reputable" seller online, and the machine had been damaged in shipping, with one spool pin broken off. She asked if I could fix it, I said no problem.
When she arrived with the machine, she mentioned that after five minutes of sewing, the machine would begin to emit a smell. I told her I'd check it out.
Well, never mind the spool pin, I was appalled to see the condition of the machine. So much so that I subsequently looked up the seller. I will not mention him by name, but based on his reputation and self-description, any of us would probably buy a machine from this guy in a heartbeat. He has been working on machines for longer than I've been alive, so I cannot understand how he let these things go.
The first thing I went to do is plug her machine in to uncover the source of the smell, but I stopped dead in my tracks. Check it out:
See that green stuff? Old Singer lubricant (grease) turns that shade of green after many years, I've seen it inside plenty a machine. And here it is on the terminal prongs--not good. Even worse, there was more on the cable:
Folks if you ever see this, do NOT plug your machine in. Electricity should never mix with oil, grease, or any kind of lubricant. The woman who brought me the machine is lucky that the machine didn't start a fire.
It's not difficult to clean old grease off of metal, you just go at it with Q-tips and rubbing alcohol. So I'm really surprised the seller was so careless. Here's the terminal after I cleaned it:
However, I was not able to get the grease out of the power cable. There's no way I can see inside, so there's no way I can ensure I've removed every last bit of grease. I told the customer her cheapest option was to order a replacement cable from Sew-Classic. Since it's only $6.99, it really bothered me that the original seller didn't supply one rather than the grease-soaked one.
The rest of the machine wasn't much better. There was an antique-looking piece of thread jammed under the hook assembly, providing friction:
It took me a little time, since it was wound around the shaft, but I fished the thing out. I estimated it was 8 inches long, but I measured it just now out of curiosity and it was a foot.
And the rest of the machine was just filthy. I don't mean the body of the machine, which almost doesn't matter--that's basically cosmetic--but the working parts of the machine, like the tension assembly. I stripped every part that needed it to give it a thorough cleaning. Here are the before-and-after shots:
I saved the spool pin for last. I'm sorry I don't have photos of this part, but I'll explain how to do it in case one of you needs to. With a 401, you have to take the lid holding the spool pins off. I futzed around with the hinges for a while trying to figure out how to remove it without breaking it, then finally realized you just keep moving the lid in the open direction, gently, until it pops off. (This is only the second slant-needle machine I've worked on, I'm usually doing older cast-iron models.)
Then I was going to hammer out the spool pin using a hammer and a blunt nail, which is how I've gotten broken spool pins out of the base of a 201-2 and 15-91 (where you place the spool for bobbin winding). But after clamping the lid upside down to my workbench, I worried that hammering it out might bend the lid.
So instead I drilled the spool pin out, since it was plastic. What you do is start with a 1/16th" bit and drill through the center of the broken spool pin. (Try to get it as dead-center as you can, because you don't want to hit the metal part of the lid and potentially ruin the hole.) Then you just drill through the hole with progressively larger drill bits, and eventually the spool pin fragments just disintegrate and fall out of the hole.
That's the tricky part. Replacing a plastic spoon pin is easy, you just wedge it in there manually, you don't have to tap it in with a hammer like you do with a metal spool pin.
Using one of my own grease-free cords, I spent twenty minutes stitching the machine in and running it full-tilt. No burning smell, and a nice, strong-running motor in this machine.
There's a couple of things I want to say. While I cleaned the customer's machine for a few hours, I didn't give it what I call the "Million-Dollar Treatment," where I slave over a machine for weeks or even months as a time-consuming hobby. Because I think no customer is going to pay for what I'd have to charge them for that kind of time. So I didn't get into every last nook and cranny but instead cleaned up the most offensive and function-affecting areas.
Secondly, to be fair, I do not know what condition the original seller received the machine in. Maybe it was a total train wreck and he brought it back from the dead, and maybe I oughtn't malign him?
Then again, there's no excuse for neglecting basic safety. Yeah, that settles it. Far as I'm concerned the grease on the power cable is a damning indictment. Can you imagine if this poor woman had burned her house down over a sewing machine? Folks, if you're ever going to buy a used machine, please do inspect the terminal and power cable carefully to be sure they're not covered in grease.
I don't mean to be sensationalist or self-promoting. I have never, ever heard of someone burning their house down in a fire caused by a sewing machine. But common sense dictates that any sewing machine repairperson ought to do their best to minimize those risks. It took me less than fifteen minutes to get the grease off of the prongs, and ordering a new cable takes less time than that. Those things should have been done during the initial refurbishment.
If you see that green grease on your terminal prongs, clean it off with a Q-tip and rubbing alcohol, then give it plenty of time to dry off before you plug it back in. And if your power cable has grease in the ports, recycle it and buy a new one--$6.99 is a small price to pay for peace of mind.
Reader Questions: Rewiring a 99?
![]() |
| All photos in this entry by Azul from California |
Azul from California writes,
I was excited to discover your motor rewiring series, but I have a model 99, which does not have the potted motor and does involve a light switch. The motor is mounted on the side, as seen below.
What I have is a Singer 99-13 (according to the Sandman Singer identifying page) from 1937 which I picked up off the street. It’s in excellent cosmetic shape, but the wiring is in bad shape and down to bare metal in parts (mostly due to my boyfriend pulling away the corroded/melted bits).
I do know how to solder, and have access to the necessary tools and materials (although not yet, alas, the Chapman screwdrivers). My boyfriend knows how to repair electrical stuff in general, but does not have Singer-specific knowledge, although he’s enthusiastic and unworried about this (“it’s a light” and “it’s a motor,” he says). I did take the machine to a local repair place, where they seemed to think the wiring problem not too bad, they doubted that there was internal damage inside the motor, but of course would have to take it apart to know for certain.
My question is this: Do you think your tutorial, along with general principles of electrical repair, would be sufficient to work on this motor, although it’s not exactly the same type as the one in your tutorial? Or are there Singer specific issues that would make you recommend instead taking it to a professional, to for example avoid electrocution :o), or messing up the machine further? I’m not sure if you’re able to answer that, but thought I’d ask.
First off, congratulations on the free 99! That's an awesome find.
Secondly, good on your boyfriend for pulling off the rotted wiring insulation. I’ve seen sellers completely ignore that, as if hoping it will go away. As you can see, the wiring can easily come into contact with the body of the machine, which is all metal. That’s bad news if left untended.
To answer your question: While electricity is obviously dangerous if not handled properly, there is no Singer-specific issue I can think of that would prevent someone with knowledge of “general principles of electrical repair” from correctly re-wiring your motor.
Because we live in a country where people love to sue each other, I think I cannot just tell you to go ahead and do it. But the "sideboard-mounted" motor on your 99 (I put that in quotes because “sideboard-mounted” is not an official term, it’s just what I call it) is a simple and basic universal motor, the same you'd find on a 66, a 206, a 15-90, or a 201-3. The Featherweight 221 would also have a similar motor, with slightly less power. Bottom line: The principles of re-wiring yours would be the same as in the potted motor tutorial, and at the very least you would not have to deal with the worm removal shown in the potted motor tutorial (though you would still have to deal with brushes, grease wicks, the washer on the armature shaft, et cetera). Your motor simply turns the pulley sticking out of it, which in turn drives the belt, simplifying things a bit.
As long as you competently re-wire the machine in the exact same configuration in which it originally was, and using the proper materials, I would think you'd have no problem; but of course I do not have first-hand knowledge of you and your boyfriend's exact skill levels.
Also be aware that if worse comes to worst, you can buy simple replacement motors and install those on your machine, should you not feel like tackling the job. The reason I wrote the tutorial specifically for the potted motors is because those cannot be replaced with new motors due to their unusual design (i.e. the way that they fit onto the machine).
If you do decide to buy a new motor, I recommend Sew-Classic sewing machine supplies. While I've never bought a replacement motor from them (I always re-wire mine myself, to save money and because I find it satisfying), I've bought many other parts from Sew-Classic. Jenny, the woman who runs the company, is knowledgeable, responsive via e-mail in case you don't know exactly what you need, and has a (well-deserved) great reputation. She’s my go-to person when I need parts.
If you do decide to tackle it yourself, remember to take lots of photos as you disassemble the motor, so you have a reference for re-assembly. And a replacement motor is less than $25, which should take some of the pressure off.
Good luck with it,
- Rain
How to Re-wire a Potted Motor, Part 1: Wire, Wire Stripping, & Wire Braiding
Singer’s models 15-91 and 201-2 come with beltless, direct-drive motors colloquially called “potted” motors. Sometimes the wiring inside is shot and needs to be replaced; half a century of temperature extremes can rot the insulation away, leaving dangerous bare-metal wires inside an all-metal machine that can transmit a shock to the user.
In this series of entries I’ll teach you to re-wire a potted motor. I’m writing this for people with zero experience, so there are quite a few tools and skills we’ll need to cover. The good news is, you can practice all of these skills without touching your sewing machine, so you can be sure you’ll be able to pull this off before you open your machine up.
Also be aware that you’ll need to acquire a fair amount of tools and materials to re-wire a motor. You or your spouse may already own some. In a nutshell, what we’re ultimately going to need is:
- Wiring
- Wire Strippers/Cutters
- Soldering Iron
- Solder
- “Helping Hands” Tool
- Heat Shrink Insulation
- Heat Gun or cigarette lighter
In addition, you may also need a crimping tool and ring connectors; you'll decide for yourself after we cover how to terminate the wire in a future entry. And don’t worry if you don’t know what some of this stuff is, we’ll eventually get into all of it.
The first things we need to cover are a) the proper type of wiring to use, b) how to “strip” wires, and c) how to braid two wires together.
Types of Wiring
Electrical wiring comes in two types. The first is solid-core, also called single-strand. That’s what a coat hanger is, just one piece of wire. The other kind is called stranded wire because, well, it comes in strands. That’s what we need to use here.
Thirdly, wiring comes in different gauges, or thicknesses. Plumbing pipes come in different thicknesses too, according to the amount of water that will flow through them. Similarly, the wiring gauge or thickness is commensurate with the amount of current they need to safely convey. What we need is 18-gauge wiring, also referred to as AWG-18. (That “AWG” stands for “American Wire Gauge.” Apologies to overseas readers but I am not sure what the foreign equivalents are.)
Lastly, wiring has insulation--also called “jacketing”--that also comes in different thicknesses. The thinnest type is called SPT-1, and that’s what we need to re-wire a motor, or the sewing machine’s light fixture for that matter. SPT-1 wiring typically goes inside of devices, where there will be no abrasion. There is also a thicker jacketing called SPT-2, and that’s what we’d use to re-wire a foot pedal. SPT-2 typically goes outside of machines, where the thicker jacketing means it can stand up to abrasion. I’ll cover foot pedal re-wiring at some future date.
![]() |
| Left: Black 18-gauge wiring (doubled) with SPT-2 jacketing. Right: Red 18-gauge wiring with SPT-1 jacketing. |
You need to buy “Copper-stranded 18-gauge wiring with SPT-1 jacketing.” Don’t deviate. You should be able to walk into any hardware or electrical supply store and find this stuff. It should be cheap, around 10 cents a foot. Buy two different colors. (I prefer red and black, but all that matters is that you can tell one color from another.) To re-wire your average machine you’ll only need a foot or so of each color, but since we’re going to need to practice a lot first, buy five to ten feet of each.
If they’re out of it, please resist the temptation to buy any other kind of wiring. Don’t mess around with electricity. Buy the right thing. You might be tempted to buy 18-gauge wiring with the SPT-2 jacketing, mistakenly thinking thicker is better, but that’s a mistake, as you’ll see in a future entry.
Wire Stripping
Now that you’ve got the right wire, you need to learn how to strip it. This is so you can connect new wiring to existing wiring. So you’ll need to get your hands on a wire stripper.
Wire Stripper Reviews
All wire strippers are not created equal, as I learned the hard way. Please save yourself a few bucks and have a look at this description of three different types of wire strippers. At the bottom I’ll place a video that shows me using each one.
My buddy Jeff can fix anything with practically any tool. He just has that gift, to be able to take the wrong tool and the wrong fastener and just make something work.
I am not my buddy Jeff. I am not a natural handyman and I do not have that gift. My occasional clumsiness means it really pays off for me to use the best tool for the job, to reduce the chances I’ll screw it up. I’ve written these reviews with that in mind.
This is the most common type that you’ll find in every hardware shop. It’s also, in my opinion, a total piece of crap for stripping wires:
It's made by Gardner Bender and I bought it first because it was inexpensive (under $10) and I didn’t know any better. The way a wire stripper works is you squeeze it around the wire at the point where you want to strip off, and the sharp blade cuts into just the insulation, not the copper part.
Then you can pull the insulation off like pulling a sock off of a foot. In theory, anyway.
If you look closely at this tool, you’ll see it’s so poorly made that the holes don’t quite line up. This makes for messy stripping.
However, the Gardner Bender has a cutter at the tip for snipping wires, and also has a part for crimping, which we’ll cover later. So for those two necessary things, it remains useful.
The second one I bought was a Klein Tools Curve wire stripper ($11.52), which seemed more precisely made.
The holes line up correctly.
But I had a hard time using this tool, as you’ll see in the video below, probably because I’m a klutz. The amount of force I needed to apply to strip the wire just seemed unreasonable. I also don’t want to apply that much force to a wire connected to the motor.
The Klein Tools wire stripper does have a cutter, so at least there’s that. But overall I do not recommend this one, and I would only buy it if it was the only thing I could get.
The third and final tool I bought, and the one that I love, is this “Katapult,” also made by Klein tools:
At $24.65 it’s the most expensive in the bunch, for a reason: It’s designed in a clever way so that when you squeeze the handle, it automatically strips the insulation and slides it off in one easy step. It places almost no stress on the wire, which I like.
One piece of advice if using the Katapult: After you squeeze the tool and it pulls the insulation off, do NOT just release the handle. If you do, the tool will close too quickly and fray the wiring. What you want to do is squeeze the tool, then gently remove the wiring by pulling it to the left before releasing the tool handles. This is really tough to describe or even show in video, you just have to play around with the tool and you’ll see what I mean. So practice on some wire scraps first.
One lame thing about the Katapult is that it does not have a cutter. If you buy only this tool, you’ll still need to buy one of the others to cut the wire. For a cutter, I’d recommend the crappy Gardner Bender because it's cheap and has a cutter and a crimper--though you may not need to crimp, as we’ll cover in a future entry. Alternatively, you can always cut wiring with a pair of tin snips, aviation shears, or EMT shears, if you have any of those handy.
Here’s the video of what it looks like to use all three of these:
You should be able to find at least some of these tools at your local hardware store. I like to support my local businesses, but for those of you who live out in the sticks, or if your stores don’t carry these things,you can order them from Amazon:
Full Disclosure: I should mention again that if you purchase these tools through these links, Amazon sends me a few cents for sending you their way, as I have signed up for their affiliate program. That does not mean I am urging you to buy things you don’t need so I can make a profit. Feel free to ignore these links! I include them in the event that you do need to mail-order the tool and would like to support this blog.
Furthermore, for those who do wish to support the blog, if you buy anything at all on Amazon (like books or whatever), if you first go to Amazon by clicking the link at the top of this page, they’ll also send me a few cents on that purchase. The price is the same for you whether you go through here or go directly to Amazon, they don’t charge you any extra. But please remember that this blog will always be free and you’re not obligated to click anything. I’m not in this for the money, but I wanted to set up a way to make it possible that a few extra bucks might roll in.
Wire Braiding
Once you’ve gotten good at stripping wires, you’ll have to practice braiding them. Braiding is how you’ll connect new wiring to old wiring in preparation for soldering. When we finally get inside the motor you’ll see you don’t have a lot of room to play around in there, so it’s imperative to practice braiding wires first by using scrap wiring.
Start off by stripping about 3/4” of insulation off the end of a wire.
Then grab it between your thumb and finger and twist, twist, twist.
It should look like this:
This reduces the chances you’re going to have frayed wire strands, which we want to avoid because it causes problems later.
Then strip another piece of wire and braid that one too.
Next, cross the two wires at the midpoints.
Then, braid those two wires together. It should look something like this:
It’s trickier than it looks, at least for me, as my fingers always feel too big. But just keep practicing, practicing, practicing, and eventually you’ll get good at it.
Your first goal should be to braid two wires together tightly enough that when you pull on them gently, they do not come apart. I recommend starting with two 3/4” lengths of exposed wire, or even 1” if you’re clumsy, to get the hang of it.
Then, once you’ve mastered that, start using shorter lengths of stripped wire. Your end goal is to get it down to about 1/2” of exposed wire that you can cleanly braid together.
Once you can consistently braid 1/2” of wiring together nice and tightly, you’ll be ready to move on to soldering, which we’ll get to next.
As you practice braiding each piece, don’t throw those pieces away! Even the crappy ones, save them. Cut each side off so that you’ve got your braid in the middle, and about two inches of insulation on either side. We’re going to use those pieces to practice soldering on.
Go on to Part 2: Tools & Materials for Soldering
Documented Fix: Singer 237 Tension Assembly
I only collect and repair certain models of black cast-iron Singers made through the 1950s, and those are all I planned to cover in this blog; but when my neighbor mentioned she had a thrift-store 237 that was giving her problems, I couldn't help but take a look. (While I solved the problem, this post will be more of a documented fix than a tutorial, as I've only performed this procedure a couple times and don't know it thoroughly enough to try to teach it yet.)
First thing that jumped out at me was the duct-tape spool pin. I don't know much about the 237 except that it's from the '60s, and my first thought was "Wow, Singer really started cutting corners." My neighbor confessed to creating the spool pin.
I started reading up on the 237 on the Yahoo Vintage Singers group--it is a wealth of information--and found that it's actually a well-regarded zig-zag machine, the last of the all-metal interiors Singer made (although the little door that holds the rotating hook in place is plastic).
She said the machine was giving her tension problems. When I first encounter a machine, I never plug it in and start running it, not since I found a finish nail buried inside a 221, and a 201 with a mis-installed hook retaining ring. Had I plugged either of those machines in and hit the gas, I might've wrecked something. So I always eyeball the machine first.
Giving the 237 a visual once-over both inside and out, it finally hit me. Folks, you notice anything unusual about this photo?
Let me zoom in for you:
Yep, while I don't know this machine at all, I'm pretty sure the tension assembly is not supposed to be shaped like the end of a ski jump. I'm guessing this machine was dropped. However it happened, there's no way you can get consistent tension if the two tension discs can't cleanly come together, and they can't if the stud they're riding on is bent like that.
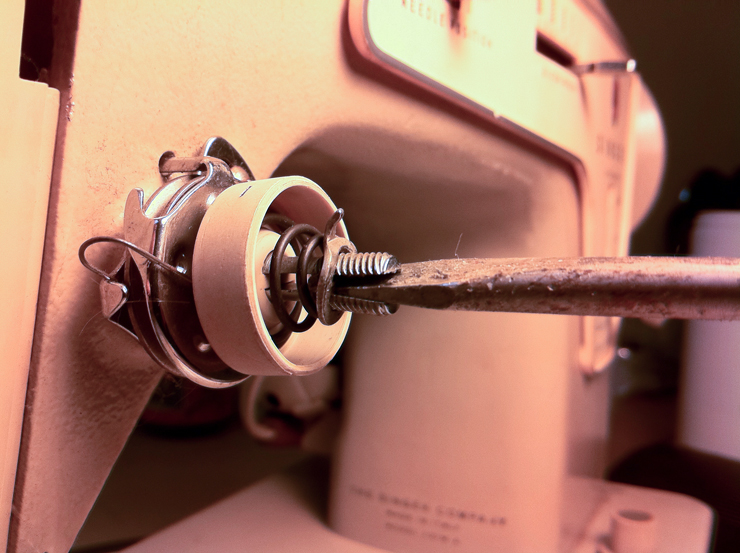
I've had to fix this on one of my 201s, so I sort of knew what to do. First step is to disassemble the tension assembly. In this case, the split ends of the tension stud were so badly bent that the washer and beehive spring wouldn't even come off. I used a large-bladed screwdriver to pry them open wide enough to slide everything off.
At first I pried them too widely apart, so had to use pliers to bring them back together. Whenever you use pliers on a threaded part, always wrap the part in a leather scrap first. If you damage threads with the teeth on pliers, you won't be able to screw anything back onto them. The leather gives you a good cushion but still provides grip.
Finally I got the parts off. I left the stud in the machine--easier than putting it in a vise, which I don't have anyway--and started trying to straighten it. I did this by alternating between prying them apart with the screwdriver, then closing them back up with the pliers. If you do this you'll want to be cautious and use minimal force, as the stud metal is quite soft and easily bent.
This required a lot of back-and-forth. Here I got the top piece nice and straight, but the bottom piece was wrong, and the overall stud was still bent slightly upwards.
Next I got the main shaft straight but the split parts going downwards.
Finally I got it to this state:
It's not dead-perfect, but it's close enough to get it working right. I've found that sometimes when you try to get something perfect, you go too far and mess the thing up. The sewing machine repair teacher Ray White taught us about knowing when to stop, and I listened. The important things here are that the pin inside needs to be able to smoothly travel in a straight line, which it now can, the split part of the stud needs to be parallel enough to cleanly get that thumb nut screwed onto, and that thumb screw has to be parallel with the discs when the tension is activated.
I put everything back together and eyeballed it. Everything seemed straight and parallel enough to try. (In this photo the presser foot is up, which is why the discs are angled lazily. I should've taken this photo with the presser foot down, which would show you the discs in their proper under-tension position.)
I oiled the machine up from top to bottom, cleaned out the feed dogs and hook area, then put everything back together.
Next I did the stitch-in, as I learned to do in Ray White's class, and got the thread balanced. Everything stitched great.
Here it is back at my neighbor's house, and yes, I put in a new spool pin. The duct tape one was driving me nuts.
I know this wasn't a proper tutorial--there aren't enough detailed photos and specific instruction--but if many of you have the problem of a bent tension assembly, let me know in the comments and I'll try to prepare one down the line.
Langganan:
Postingan (Atom)