Tampilkan postingan dengan label 15-91. Tampilkan semua postingan

Reader Questions: Eric's Knee-Operated 15-91

All photos in this entry by Eric from Ottawa

Eric from Ottawa writes,

[The 15-91 I recently acquired] looks like it's in great shape, but it doesn't run. It has a knee switch rather than a foot pedal and it looks like the motor controller has failed. 

To test it, I unscrewed the center of the flywheel so there was no load and plugged it in and got nowhere, even with the knee switch in and fully engaged.

Do you think it's worth re-wiring it to use a standard foot pedal like most of the ones I've seen?


Hi Eric, first off, a little about your machine. The chrome rim on the handwheel plus the design on the faceplate, from the little bit of it that we can see in the photo up top, indicate this machine is from the 1930s or early 1940s (assuming those parts are original). The old-school cylindrical Singerlight visible in the photo below also indicates the machine is from that era.


The “J-“ prefix on the serial number plate indicates your machine was made in Singer’s Canadian plant in Quebec.


Secondly, good on you for trying to run the motor with no load, that’s exactly the correct first step to test out a motor.


As you’ve observed, your machine uses a knee-activated controller.
 

For those readers unfamiliar with this device, it was an early alternative to the foot pedal most of us know, and it eventually fell out of favor. It consisted of a motor controller placed in the right side of the wooden base:


The end of the removeable knee lever--which stows handily inside the case and underneath the machine, or occasionally up in the domed lid via clasps, when not in use--“plugs” into the hole in the front of the case.


Pressing against the lever would activate the motor controller, which is wired into the inside of the three-pin terminal.

Eric, there are three possibilities here: 1) The power cable is faulty. 2) The motor controller is faulty. 3) The potted motor itself is faulty. Hopefully it is #1 or #2 and not #3, as the first two are easy, relatively inexpensive fixes.

To see if it’s the power cable, try turning the light on. That’s not a 100% accurate test because the bulb may be burnt out, but at the very least, if the light does turn on you know there’s power flowing through the cable. Another thing you can do is bring your cable to the house of a friend with a vintage Singer--that cable will fit a variety of machines made in the 1930s, ‘40s, ‘50s and some in the ‘60s--and see if it powers his/her machine okay. If you determine your cable is what’s faulty, you can order a replacement from Sew-Classic for US $7.95 right here. If you choose to go with a different supplier, perhaps someone local to you in Canada, note that you’re looking for a “single-lead” (as opposed to “double-lead”) cable.

If the motor controller is the problem, it is totally “worth re-wiring it to use a standard foot pedal,” to answer that question, and the good news is that it doesn’t quite require “re-wiring.” The motor controller leads are easily removed via two thumbscrews inside the three-pin terminal. There’s no cutting of wire or soldering required, it’s a simple mechanical connection. To see how to remove the leads, click here and look at the parts of the entry that pertain to removing the two motor leads, which in your case are really the controller leads. Be sure to note which two pins in the terminal those leads connect to.

To replace your motor controller with a foot pedal, you’ll need to spend a tad more. You’ll need to buy a foot controller; the least expensive offered by my preferred supplier, Sew-Classic again, goes for US $11.95.

What you can do is connect the two leads from your new foot pedal to the same two posts that you disconnected the original motor controller leads from. Then you can remove the old motor controller (attached via screws) from that compartment on the right of the wooden base, and store the pedal there.

Alternatively, if you’d like an original Singer foot pedal, you can check eBay.

If it’s the motor that’s bad, then you’ve got a fair amount of work ahead of you to figure out what exactly is wrong with it, and if it’s fixable. You may want to browse the complete “How to Re-Wire a Potted Motor” to determine how to disassemble the motor so that you can inspect the wiring, one possible culprit. But if it’s something beyond bad wiring--a burnt-out field core, for example--that’s beyond the range of my fix-it knowledge.

If you do determine the potted motor is what’s faulty, you will occasionally spot someone selling one on eBay.

Whatever you do, please don’t throw that motor controller out, even if you determine it’s bad; if you stay in this hobby long enough, you will eventually encounter someone else who may need a part from that controller--even if it’s just a single screw--so you may be able to help them rescue an otherwise non-functioning machine. Ditto with the knee lever.

Best of luck with it, congrats on the machine--I love those chrome-rimmed handwheels!--and let us all know how it turns out.

A Visual Guide to Identifying Singers from Crappy Craigslist Photos, Part 2: Narrowing Down the Model 15


In the last entry we learned to deduce if we were looking at a model 15--or something else--based on the giveaway "runway" and "ski jump" of the machine's profile.

If it is a model 15, we'll next figure out if it's a 15-91 with the potted (direct-drive) motor, a 15-90 with the side-mounted (belt-drive) motor, or an earlier model 15 that might have been treadled, hand-cranked or converted to electric.

If it's a 15-91 or 15-90, it will have minimal decals on the arm, just saying SINGER with some slight flourishes (see top photo). Earlier model 15s will have more extreme, ornate decals on the arm and pillar, like these:

Photo too small to see detail, but you can see a lot of gold on the arm, too much to be a modern 15.

So if you've determined it's a model 15 and see those large splotches of gold on the arm and pillar, you'll know it was an earlier 15. The earlier 15s don't have reverse and I don't collect them, so that's the extent of my coverage on the early 15s.

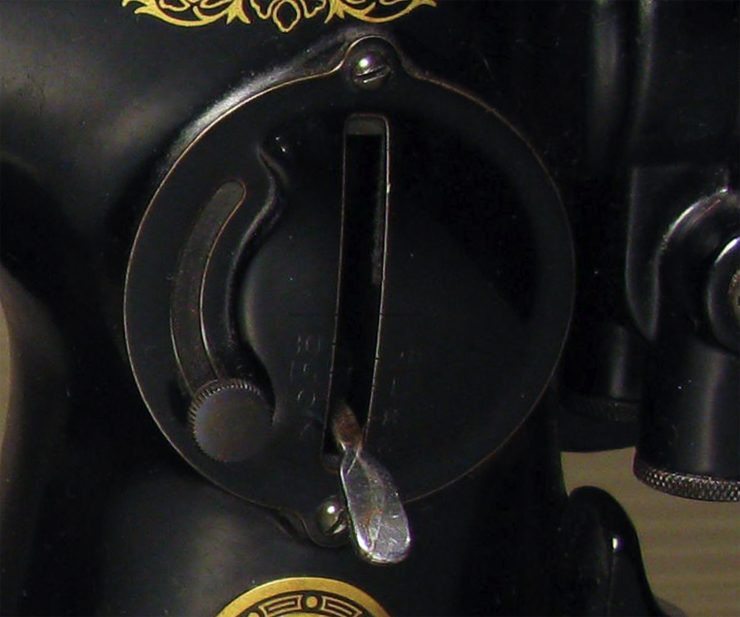
Now on to the more modern (and common, around me) later model 15s: The 15-90s and 15-91s made from the 1930s through 1950s. These all have reverse and this circular stitch length indicator plate:


(The 201 is the only other machine you'll see with this circular plate. We'll get into that later.)

The 15-91 is what I most commonly see here in the NYC area. The potted motor is easy to spot if you're lucky enough to see non-operator-side photos of the machine:


Sometimes the photo is taken from the operator side, from slightly above. In that case, look for the little "sunset" of a potted motor peeking over the machine's horizon. Sometimes it's just a little black bump that cannot otherwise be explained.


Or from a rear 3/4 angle, in which case the potted motor cannot hide completely behind the handwheel:


And sometimes, yes, people will photograph it from that one angle that makes it completely impossible to see if a potted motor is there:


The good news in that latter case is, that very angle that hides the potted motor is also perfect for revealing whether it's a 15-90 with the side-mounted motor. See the side-mounted motor peeking out here?


So to back up a second, if you see this photo...


...the absence of a side-mounted motor peeking out here (and the simple decals on the arm meaning it's a modern 15) pretty much guarantees it's a 15-91, with the potted motor just hiding from the photographer.

Okay, Quiz Time. Look at the following crap-tastic photos: Which is a 15-90, and which is a 15-91?

1
2
3
4
5
6
7
8
I threw some very tricky ones in there, using some of the worst photos I could dig up. Check below to see if you got them right.


1. Side motor, 15-90
2. No side motor, tiny bump of potted motor, 15-91
3. Side motor, 15-90
4. Side motor, 15-90
5. Tiny bump showing side motor, 15-90
6. Cannot see side motor. Potted motor is visible but with white tape on it, tricky. 15-91
7. Terribly dark photo, but the slightest irregularity in the handwheel shape shows you a potted motor is hiding back there. 15-91
8. No bump showing side motor, 15-91

If you were able to pick some of these up, hopefully you've amazed yourself. These are some terrible, terrible photos that you probably never imagined you could glean useful information from; yet we can figure out the models in them if we know what to look for. When you look through as many ads as I do, this can save you a lot of time, phone calls, e-mails, driving, and the seller and buyer wasting each other's time.

The photos are too small and crappy to tell the actual condition of the machines, of course, but knowing what models they are can at least help you quickly narrow your search.

Go on to:

Part 3: Is it a 201?

Part 4: Is it a 66?

Part 5: Is it a 99?

Or go back to:

Part 1: Is it a model 15?

Screwdrivers, Part 4: Bits That Will Fit a 15-91


If you've already got some assorted screwdriver bits that will fit parts of your Singers, and a bit-holding screwdriver handle, you don't need to purchase an entire set. You can save a couple bucks by ordering just the individual bits you need from a company like Brownells. So what I've done here is photographed the various parts of a 15-91 and labeled, below, which Brownells bit will fit it. (I figured looking at photos of the screws in question is easier than figuring out the name of the screw and checking that against a list.)

You can then order the bits you need at this link to Brownell's website. They're $2.99 a pop. Happy fixing!


("Small Singer Screwdriver" refers to the tiny silver-handled one that you use to adjust your bobbin tension.)


This brush-cap screw is made from Bakelite, not metal. Do not overtighten or it will crack!


You can assume symmetry here for the unlabeled screws.


Go on to Screwdrivers, Part 5: Bits That Fit a 201-2

How to Restore Your Stitch Length Indicator Plate


Okay folks, today I'm going to show you how to get those pretty gold numbers back onto the stitch length indicator plate, so you can actually read the darn thing. Here's your typical "attic fresh" 15-91 that's seen better days:


The stitch length indicator plate's numbers have been worn away by time, making the numbers illegible.

Now I'm gonna show you how to fix that.

Go to an art supply store and pick up some gold paint. The smallest tube you can find, because it doesn't take much. Make sure you get acrylic paint--not oil, not watercolors, not pastels, nothing but acrylic. Acrylic won't bond to the metal plate, which is what we want, for it not to bond. You'll see why. Here's the brand of paint I bought.


I wasn't sure which type of brush to use, so I bought three different kinds: A pointy brush, a fluffier pointy brush, and a wider flat brush. Yes it was a waste of money buying all three, but I knew I'd print the results here, and tell you the right brush to use after testing them all out, so at least I saved you a few bucks.

I put the quarter in the picture both to demonstrate scale and my vast personal wealth.

Remove the SLI plate. It comes out with two screws, top and bottom, then unscrew the silver knob. You can take the screws and throw them in the carpet somewhere, or carefully place them in a jar for safekeeping. Guess which one I recommend.


Next, clean the surface of the plate. I used just a Q-tip and water because it was already decently clean. If it's covered in oil or grease, you'll need to clean it with a solvent like kerosene (or lighter fluid, which is the same thing but a bit easier to manage). Do not use rubbing alcohol, it will take the paint off.


Once the plate is clean and dry, we can get down to painting. The flat brush is the right one to use. You don't even need to squeeze the paint out, just dab the brush on the tube and save yourself a step.


If you're a klutz like me and you got too much paint on the brush, just wipe it off on something unimportant, like an envelope or your roommate's birth certificate.


Now we start slapping the paint on. Move quickly--we're not painting a Picasso here, just laying down a quick, thin layer of gold over the number depressions. I find it easier to do one side at a time.


Immediately after applying the gold, take a clean Q-tip and gently wipe it across the surface, back and forth, turning it often and working quickly. Do not press hard, but work fast. It's better to do 100 fast-and-light strokes than 20 strong-and-hard ones.


At first it will seem like the paint is not coming off, but within 30 seconds your strokes will begin to pick up the paint. The reason you don't want to press hard is because if you do, you'll dig the fresh paint right out of the number grooves. You just want to gently wipe the stuff off of the top and let the paint settle in the grooves underneath. Fast-and-light, fast-and-light, keep at it and don't press hard. Keep changing to clean Q-tips as they get loaded up with paint, otherwise you'll undo your own work.


While you're cleaning off your first coating of paint, it will look like crap, like in the photo below.  The numbers are only partially filled in and it looks terrible so far, but don't be discouraged.


It takes several coats for the paint to sink into the number grooves and fill them evenly, so after you've wiped off that first coat, apply another, and repeat the whole process.


After about four coats and a lot of wiping, it starts to look like this shot, below. The numbers are starting to pop, no?


By the time you're finished, you'll probably have built up a lot of paint on the inside edge of the slot, as seen here. Don't forget to Q-tip that off too.


Acrylic dries pretty quick, so you can put the plate back on your machine just about immediately. Here's a before-and-after shot:


Not too shabby, huh? And now you can actually read the numbers without having to stick your face right up on the machine.