Tampilkan postingan dengan label tools. Tampilkan semua postingan

Screwdriver Check for Readers in Australia, Canada, China, UK Etc.


In the bobbin case removal tutorial, I asked you to use a US dollar bill to see if your screwdriver blade was the appropriate width, because I figured everyone would have a dollar bill. But now I see in the blog stats there are readers overseas as well, and you guys probably don't have as much of our precious currency on hand as you'd like.

Instead of mailing you all dollar bills, I've been casting about my apartment for measuring devices indigenous to your countries, like a kangaroo, a flapjack, a chopstick, a press scandal, et cetera when I realized I should just use the machine itself. So here it is: If you have a Singer 201, don't have the little silver Singer screwdriver, and want to see if a different small screwdriver is one you can use to pop the bobbin case clip open, check it this way:


The blade should be just a smidgen smaller than this black space inside the decals.


Don't have a 201 with the "paperclip" decal style? Another way to check, if slightly harder to see, is by comparing the blade to the feed dogs.


The blade should be about the same width as the actual feed dogs (and narrower than the feed dog slots, obviously).


The reason I don't ask you to check the blade by sticking it into the actual place you'd be using it, the slot in the hook assembly, is because a) I wouldn't want novice wrenchers to wedge a too-big screwdriver in there and potentially damage the part, which would be disheartening, and b) I want to save you the trouble of taking everything apart to get down to the hook assembly, only to find you don't have the right tool to finish the job.

Having the right tool for the job is everything! Attempting a job with the wrong tool can botch it and put you off wrenching for good. Using the right tool makes the job go smoothly and will boost your wrenching confidence.

Screwdrivers, Part 5: Bits That Fit a 201-2


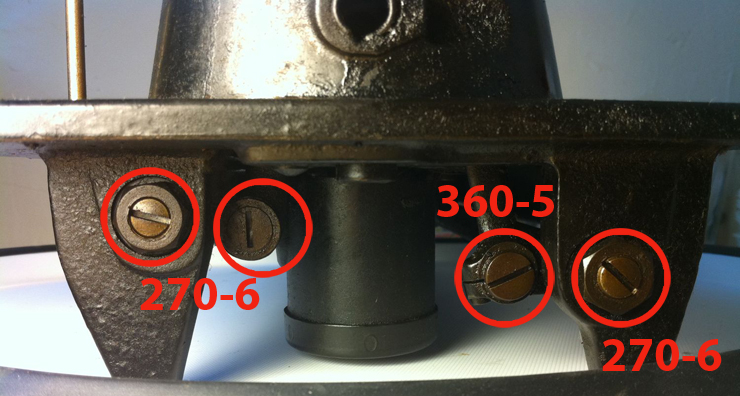
Above and below are photos of screws you might need to get to on a Singer 201-2, and the corresponding Brownells screwdriver bit number that will fit that screw. You can then order the bits you need at this link to Brownell's website (at $2.99 a pop).

I'm not sure if this is helpful to anyone, but if it is and there's a high enough demand, I can do a similar "Bits That Fit" for a 221 Featherweight, a 206 or a 99.

I've made these photos pretty big, because on other instructional websites I've seen I always find the photos too small. If these are difficult for you to load, too big, or not big enough, please let me know in the comments.


Screwdrivers, Part 3: Which Set Do I (or Don't I) Need?


As I mentioned earlier, a good set of hollow-ground screwdriver bits is a must if you're going to work on your machine. You can choose to buy an entire set or buy the bits individually, which may work out cheaper depending on your needs. If you are a gun-owning household, you may already have a set lying around the house, as gunsmithing screwdrivers are hollow-ground. (By the way, the hexagonal shafts of screwdriver bits are standardized, so you can use any bit with any other manufacturer's handle.)

Here I'll review the three sets I have experience with, and point out some purchasing errors I made, in hopes you won't do the same. If you already have some screwdriver bits that fit some Singer parts, do not buy an entirely new set, that's a waste of money. Just wait until the next entry, where I'll cover some individual bits you can add to the ones you have. That will be a lot cheaper.


B-Square


My first purchase was this B-Square screwdriver set. I got it for $33 at a local gun store, it was the only set they had. I quickly regretted buying it as most of the bit blades are too thin for most Singer screws. That being said, the handle included in the set is my favorite of all I own:


The long shaft provides good torque, and it's my go-to handle for removing tough screws (like the thick ones that attach the potted motor of a 201-2 or 15-91 to the body). I use it with non-B-Square bits.

If you own a wide variety of sewing machines (or guns) you'll be working on, perhaps B-Square's thin-blade bits will work for you, but in practice I hardly use any of them. I wouldn't recommend this set if you're working exclusively on Singers.

Brownells


The second gunsmithing tool company I looked into was Brownells. Having learned my lesson by wasting my money on the B-Square set filled with bits I didn't need, I painstakingly measured a bunch of Singer screw slots with a caliper to determine the size of bits I would need. I then ordered just the ones I needed at $2.99 per bit, and ordered a short handle and case to carry them all. Brownells also sells screwdriver sets, but I found that none of them had a high percentage of bits that I needed.

The Brownells bits are my favorite of all I own. They're one-and-a-half inches long, making them both easy to handle and useable as mini-screwdrivers in their own right, which I really like.


This short handle I ordered from them (#080-089-005) is good for spaces where the long B Square handle won't fit, like when you need to remove a machine's hinge screws from a case or cabinet.


The short handle is great for getting into cabinets and cases.

By the way I mis-measured some screws and had to re-order some different bits, so I wasted about $20. To help you avoid this problem, I'll cover exactly which Brownells bits are good for Singers in the next entry (it's gonna take a lot of photos).

Chapman

If you don't want to bother with purchasing individual bits, Chapman Manufacturing Company's 9600 set is the best value for the money. For about $29 you get a good range of 12 slotted-head bits (and some other shapes I never use), the ratchet, and a handle with extension. With just these 12 bits I'm able to remove every screw I've tried on a Singer 15-91 and 201-2. The extendable handle is useful because you can make it a long or short screwdriver, and as I described in an earlier entry, the ratchet is great for taking off the needleplate and feed dogs.


While the Chapman bits are not as long as the Brownells bits, they are also designed to be used as mini-screwdrivers, with a knurled grip area at the top.


The Chapman set is the one used and recommended by Ray White, the sewing machine repairperson whose class I recently had the pleasure of taking. He mentioned that he had heard some reports of people occasionally breaking these bits; in the event of a stuck screw, Chapman bits are designed to break before the screw does, but I have not experienced this myself.

You can mail-order the Chapman set (#K9600) from Ray White here.

You can also order it on Amazon at this link:


Conclusion

If I had to start over with screwdriver sets, knowing what I know now, I'd probably just buy the Chapman set and save the rest of my money. I've spent over $100 to find out what works, and while I can't get that money back, I can at least pass this information on. You should be able to get what you need for about $30, less if you already have some bits or handles to start with.

I like the Brownells for their heft but the Chapmans serve equally well and cost less. I find the B-Square bits, in addition to not fitting Singer screws well, so short that they're difficult to handle. They're so stubby I often have trouble getting them out of the magnetic handles and sometimes I have to use pliers.


Another thing you may want to consider is the size of the cases. For example, if you're going to be the resident repairperson for your quilting group, the Chapman case is the smallest: For guys, it will fit in a jacket pocket; for gals, it will fit in a purse.


Full Disclosure


Lastly, I should mention the Amazon link up above. Whenever you see me put up an Amazon link, that's because I signed up for their affiliates program. That means if you click on the link and actually buy the product, Amazon gives me a few cents. Because this is the case, I don't want you to think I'll push junky products on this blog and try to trick you into buying them. I'll only give honest reviews of products I have direct experience with, and if Amazon sells them, I'll put up a link. Believe you me, any money that happens to trickle in from Amazon is going back into sewing machine repair research.


Go on to Screwdrivers, Part 4: Bits That Will Fit a 15-91

Screwdrivers, Part 2: Removing Your Needle Plate and Feed Dogs


Up top is a Singer 201-2, a 206, a 15-91 and a 221 Featherweight. They all use the same feed dog screws and needleplate screws. You'll want to remove your needleplate and feed dogs pretty regularly to clean out all the lint that gathers underneath them. Now let's talk about how to easily get them off.

In the last post, I wrote about how the arm of the machine makes it impossible to get a screwdriver straight into the needle plate or feed dog screws. Even the stubbiest screwdriver just won't fit. That doesn't stop other people from trying (and failing), so inevitably you'll see these machines with partially stripped screws.

If there's any purchase left in the screw at all, here's two tools you can use to get those screws out. (If they're already too stripped, you'll have to take it to a pro.)


NOT my first choice

These offset screwdrivers are made by Tuff Stuff, which is not a tool company you hear people rave about, but I bought 'em because they were hollow-ground and the only thing my local hardware store had (just under $10, probably cheaper near you since NYC is expensive). I don't like these but I include this review because they're common and might be the only thing you can get locally, depending on where you live. I see these all the time in Mom-&-Pop hardware stores, they sell them both in a single pack.


Amazingly, the larger one is a good fit for a Singer needleplate screw, and the smaller one is a decent-enough fit for a feed dog screw. I was worried the steel on these tools would be soft and cheap, but surprisingly they got even stuck screws off without losing material or slipping.

When using offset screwdrivers, you don't just stick 'em in the slot and turn. You have to provide a lot of downward pressure on them, particularly if the screw is already partially stripped.


Press down very hard where the arrow is, as if you're trying to push the screwdriver right through the screw. You really have to drive it down into the slot, particularly if the screw has been overtightened, as I often find them.
Keep the shaft going straight into the screw.

Don't let it tip at an angle! Danger of stripping or slipping!
Warning: If you are clumsy, use your other hand to steady the screwdriver shaft near the screw. If you are not careful, you can cause the screwdriver to slip off and scratch the finish of your machine. If you have doubts, practice this on one of your beaters.

I only use this driver to break the screw loose, not undo the whole thing. Using offset screwdrivers under the sewing machine arm are a pain because you can only turn it a little, then you have to keep resetting it and turning it. So after breaking the screw loose, I use a properly-sized Brownell bit, which is so long that you can use the bit itself as a mini-screwdriver. (If you've never heard of Brownell bits, don't worry, I'll cover them in the next entry.)

Using the bit as a mini-screwdriver makes the job quicker.

Now, here's the tool I actually recommend:


This is a small ratcheting handle made by Chapman tools. They come in Chapman's screwdriver bit sets, but you can also buy them individually. The cheapest price I've seen for these is on Amazon, $4.25. Here's a link:


(Husky also makes one that I've seen at Home Depot for $6.99, but I've never used it.)


I like this ratchet better than the offset screwdriver because you just stick the bit you need in there, and you can pop the bit out, rotate it, and put it back in if the screw slot is at an inconvenient angle. If you don't know what I mean by this, it will become clear when you're actually trying to take the screw out.


As with the offset screwdriver, provide a lot of downward pressure along the shaft of the bit to keep it firmly seated in the screw. Once you've got that downward pressure going, you can start turning the handle to break the screw loose.


Again, after the screw's loose, you can get rid of the handle and just use the bit to unscrew it the rest of the way.

Looking at the bottom of the feed dog, you see why it's a good idea to regularly take it off and clean it. This lint gathered after I sewed just two pairs of boxer shorts; you can imagine how much would be under there if you're sewing, say, a quilt.


Here's a tip for when you put everything back together: I've found it's okay to tighten the needleplate screws just using the bit, which does not provide the same high amount of torque as if you tighten it with the ratchet or offset screwdriver. But the feed dog screws are a different story--those have to be tightened down using the ratchet or offset screwdriver. Every time I've tried tightening the feed dog screws using just the bit, when I start sewing, the vibration of the machine eventually causes those screws to start backing out by themselves and the feed dogs become dislodged. Obviously this will lead to trouble, so keep those feed dogs screwed on tight.


Next I'll cover some different companies that make bits, where you can get them, which bits you'll need, and why it might not be cost-effective to buy a whole set.


Go on to Screwdrivers, Part 3: Which Set Do I (or Don't I) Need?